Solution Architecture
I am just going to share my thoughts on creating solution architecture for sharepoint application
Here I have created so many projects don't scare, you can change this according to your requirements
Normally I split solution based on requirements, but I would like to discuss general approach for SharePoint projects based on my knowledge I hope this will help you at least some part of your application
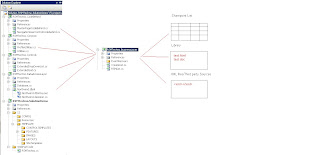
RSMTechno.CodeBehind
RSMTechno.Common
RSMTechno.Controls
RSMTechno.DataAccessLayer
RSMTecno.SolutionDemo
RSMTecno.BusinessLayer
RSMTechno.CodeBehind
I have created some page layouts and master page and deployed in to SharePoint environment , later I felt that I wanted to add some code to the master page to customize navigation bar…or some code to the sitepages,here I strucked because by default SharePoint will not generate code behind files to master page and site pages
So what I have to do?
Either I have to write inline code or I have to create separate class library and attach it to the master page or site pages
Suppose if I write inline code to the page and run the application everything works fine but if I customize the page using SharePoint designer and run the application there the problems comes because in SharePoint the customized page run through the safe mode parser, which will block any inline code from running
So what is the solution for this? what we have to follow to resolve this?
We need to follow second approach .
We have to create separate class library and register that in page using register tag , our RSMTechno.CodeBehind libarys is created for that it contains all the class files inherited from Microsoft.SharePoint.Publishing.PublishingLayoutPage or System.Web.UI.MasterPage or Sytem.web.UI.WebPartPage
Check the sample code provide below
Layout Page
using System;
using System.Web.UI;
using Microsoft.SharePoint.Publishing;
namespace RSMTechno.Pages {
public class RSMLayoutTemplate : PublishingLayoutPage {
}
}
WebPartPage
using System;
using System.Web.UI;
using Microsoft.SharePoint.Publishing;
namespace RSMTechno.Pages {
public class RSMWebPartPage: WebPartPage
{
}
}
RSMTechno.Common
This application is created mainly for utility methods and common functionally across all the functionality's like utility classes(ProfileUtility etc...)
RSMTechno.Controls
This library project is created mainly for creating custom controls
While creating webparts I prefer that first create custom control and create object for that in your webpart class ,the main advantage of this is in future suppose if your client want to shift to .net based application because of some reasons, he can easily move in to .net application because you have developed all the components using webcontrol class so you can reuse same controls in your .net application
Sometimes you may need to override dropdownlist or datagrid or any .net control to provide reusability you can use this project to handle such kind of exteded controls
I have provided sample code here
Custom Controls
Normal Custom Cotntrol
using System.Web;
using System.Web.UI;
using System.Web.UI.WebControls;
namespace RSMTechno.Controls
{
[ToolboxData("<{0}:DemoControl =server>")]
public class DemoControl : WebControl
{
//create your control
protected override void OnInit(EventArgs e)
{
//add to controls collection
base.OnInit(e);
}
}
Extended controls
using System;
using System.Collections.Generic;
using System.ComponentModel;
using System.Linq;
using System.Text;
using System.Web;
using System.Web.UI;
using System.Web.UI.WebControls;
namespace RSMTechno.Controls
{
[ToolboxData("<{0}:DropListwDefault runat=server>")]
public class ExtendedDropDownListwDefault : DropDownList
{
public ExtendedDropDownListwDefault()
{
DataTextField = "name";
DataValueField = "id";
this.AppendDataBoundItems = true;
AddDefault();
}
public void AddDefault()
{
ListItem defaultItem = new ListItem();
defaultItem.Selected = true;
defaultItem.Text = "--";
defaultItem.Value = Guid.Empty.ToString();
this.Items.Add(defaultItem);
}
}
}
WebParts class
namespace RSMTechno.WebParts
{
public class DemoControl : system.web.UI.WebControls.WebParts.WebPart
{
}
DemoControl _dc = null;
protected override void OnInit(EventArgs e)
{
_dc = new DemoControl();
this.Title = "Demo Control….";
this.Controls.Add(_dc);
base.OnInit(e);
}
}
RSMTechno.DataAccessLayer
I want to get data from other database servers and display it on web part, here we need to write a code to interact with different database servers this project library is created for that purpose only
You can find one dbml file which will interact with northwind database through LINQtoSQL
But, rarely we use this library project because MOSS has provided some OOTB functionality to interact with external database servers
RSMTecno.SolutionDemo
This is the heart of the solution; this will take care of all the things like installing the web parts, site definitions, master pages and user controls etc... using features
Here, you can find some folders which are mapped to exactly 12 hive folder structure in sharepoint environment like CONTROLTEMPLATES,RESOURCES,LAYOUTS and FEATURES etc...
While deploying what are all things you have placed uder these folder structure will be automatically dumped in to sharepoint 12 hive environment
I am using wspbuilder for building and deploying features
I have posted one article on how to build and deploy features using wspbuilder please go through that if you have any doubts
RSMTechno.BusinessLayer
This will seaparate your business logic and it provides more reusability and maintanence
Each and every component will interact with this to fetch data from sharepoint document library or list or xml file or from third party resources and populate accordingly
Some people asked me why I have to create five projects I will use one or two , yes ofcourse if you want you can use but what about maintenance and reusability just think?
Building solution is not a simple task you have to consider lot of things like maintenance, reusability,supports testdriven development etc...
Let us take this simple scenario in future, if I want to add one new control in to my sharepoint application? what are all things do I need to do? I will just go and simply create one server control under RSMTechno.Control project and build that project and deploy that assembly into GAC or BIN
See how much simple it is with out building or touching other components we are completing our task
There may be some delay passing objects from one layer to another layer but I feel that is not considered amount what ever you write that should be in reusable manner and should be easily maintenable
If you want you can add different projects in the solution like RSMTECHNO.WebServices etc... based on your requirements
But be carefull unnecessary if you pass your objects in multiple layers that will affect on performance


 Once Again you have successfully created ADF file

 Our next step is to create new Page Layout


 We are successfully created new page layout our next step is to create a new page using this page layout


